How I set up Dokploy on Oracle Cloud with Tailscale and Cloudflare, what worked, what broke, and what I would do differently.
Introduction
For quite some time, my deployments looked like a typical self-hosted setup: Nginx or Nginx Proxy Manager in front, Certbot for certificates, Jenkins for builds, and Docker Compose files spread across multiple servers.
It worked, but adding a new application often meant changing configuration in several places. Much of the documentation was sitting in shell history.
That is why I started using Dokploy.
This Dokploy setup guide documents how I run it on Oracle Cloud (OCI) ARM64 instances, with Tailscale for private websites and Cloudflare for certificates. It is not a generic tutorial: the commands, mistakes and fixes come from a server I actually operate.
Dokploy is an open-source, self-hostable application deployment platform. It provides a Heroku-style workflow on infrastructure that you control. It uses Docker-based deployments and integrates with Traefik for routing and HTTPS.
Instead of manually configuring every application, I can connect a Git repository or provide a Docker image, configure the application, and manage deployments from a central dashboard.
This article covers:
- What Dokploy installs and how the components fit together.
- Benefits and trade-offs of self-hosting.
- Installation on an OCI Linux VM.
- ARM64 considerations.
- Private access to websites such as
display.example.comusing Tailscale. - Cloudflare DNS-01 certificates.
- GitHub Actions → GHCR → Dokploy CI/CD.
- Databases, backups, restore testing, and security.
- Real-world use cases and lessons learned.
Who is this guide for?
This guide is for developers and self-hosters who want to run their applications on their own infrastructure using Dokploy. It is particularly useful if you:
- Want a Heroku-style deployment experience on an Oracle Cloud VM.
- Deploy applications built with Docker, Java, Node.js, Laravel or other frameworks.
- Want to automate deployments through GitHub Actions.
- Need private access to internal websites and admin tools (such as
display.example.com) through Tailscale. - Want to manage application databases and backups from a central dashboard.
Two ways to follow the setup
The article is long, and you do not need everything on day one. If you want an application running quickly, follow Track A. Come back for Track B once the server starts carrying real traffic.
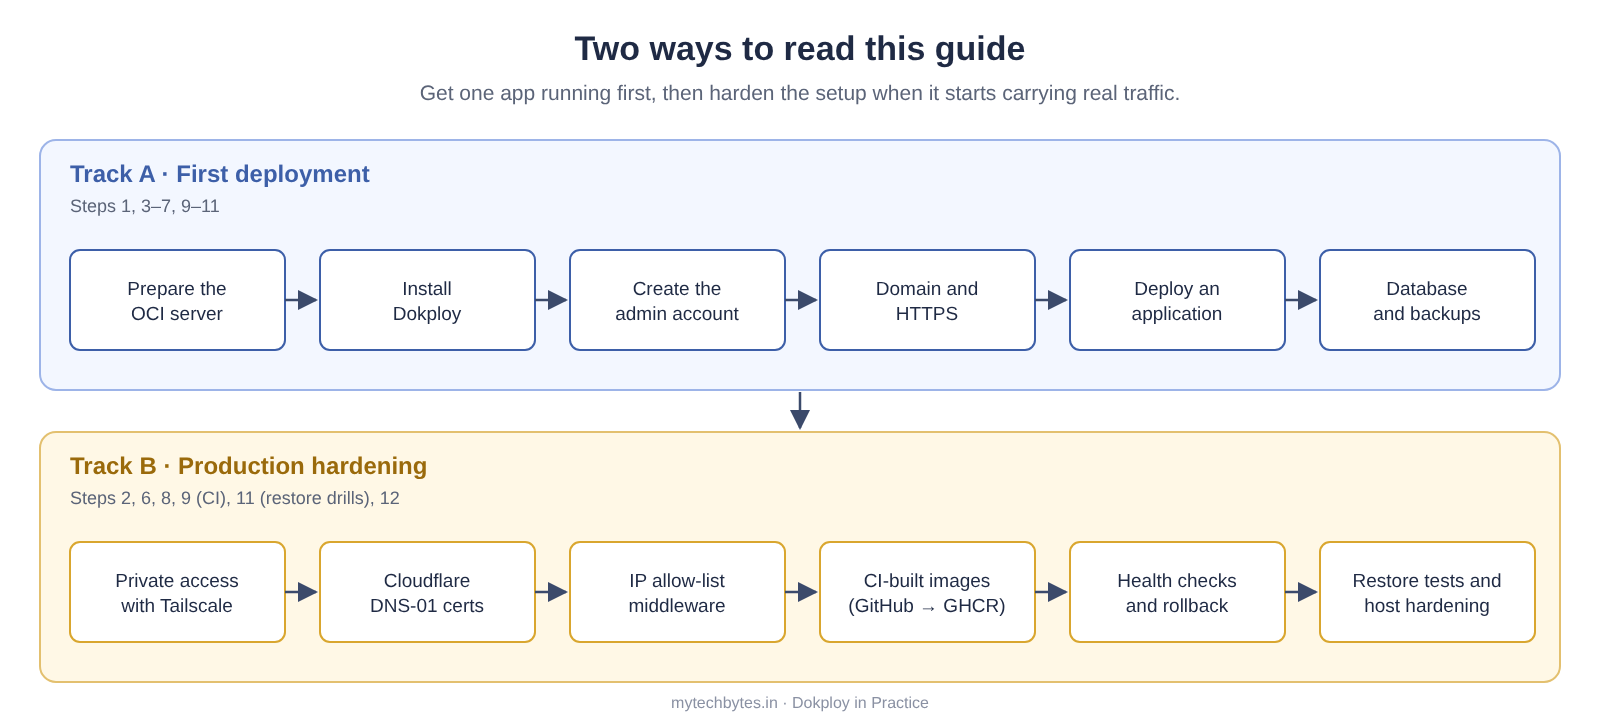
- Track A, first deployment: prepare the server, install Dokploy, create the admin account, configure a domain and HTTPS, deploy an application, then add a database and backups (Steps 1, 3 to 7 and 9 to 11).
- Track B, production hardening: private access with Tailscale, Cloudflare DNS-01, the IP allow-list middleware, CI-built images, health checks with rollback, restore testing and host hardening (Steps 2, 6, 8, 9, 11 and 12).
What Dokploy installs on your server
The standard installer does quite a lot for you. It installs Docker (if it is not already there), initialises a single-node Docker Swarm and creates an overlay network called dokploy-network. Then it starts Dokploy's own services: a Next.js app that serves the dashboard and API, PostgreSQL for Dokploy's data, Redis, and Traefik as the reverse proxy.
The exact components can vary between versions and installation options. Apps you deploy after that are attached to Dokploy's network, and Traefik looks at the hostname of each request and sends it to the right container. How a service is attached and routed depends on its type (Application, Docker Compose or Swarm stack) and on how you configure it.
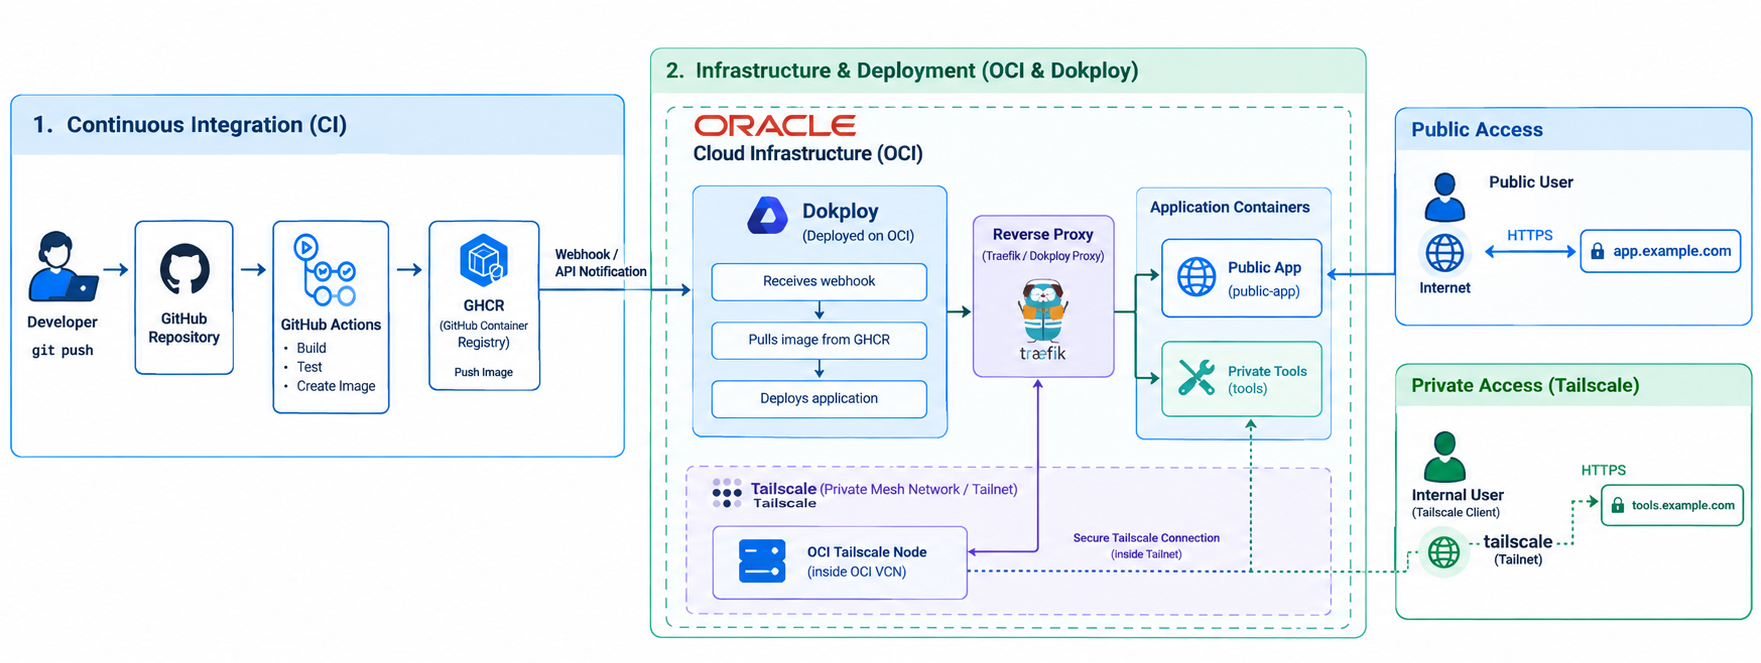
Inside Dokploy, everything is organised into projects. A project has environments (production, staging and so on) and each environment has services. There are three types of services:
| Service type | Good for | Where the code or image comes from | How domains work |
|---|---|---|---|
| Application | A single container, like a web app, API or worker | A Git repo (GitHub, GitLab, Bitbucket, Gitea or any Git URL) built with Nixpacks, Railpack, a Dockerfile, Heroku or Paketo buildpacks, or the Static builder. It can also be a ready Docker image. | Traefik file config. Domain changes apply without a redeploy. |
| Docker Compose | Multi-container stacks and ready-made tools | A Compose file from Git or pasted directly. "Stack" mode is for Swarm-native deployments. | Traefik labels. You have to redeploy after every domain change. |
| Database | PostgreSQL, MySQL, MariaDB, MongoDB and Redis | Official images, with the option to use a different image tag | Internal hostname on dokploy-network. An external port only if you enable it. |
Benefits of using Dokploy
A PaaS workflow, but the server is yours
The self-hosted edition is free, so you pay only for the VM. My apps and data stay on OCI instances that I control. And since everything is a normal Docker image or Compose file, there is no lock-in. If I move away from Dokploy tomorrow, my containers move with me.
For readers in India there is one more plus. OCI has regions in Mumbai and Hyderabad, and its Always Free Ampere (ARM64) shapes are enough to run Dokploy along with a few real applications.
HTTPS without writing Nginx configs
Add a domain, enter the port your app listens on inside the container, switch on HTTPS and that is it. Traefik gets the Let's Encrypt certificate and renews it. The container port is used only for internal routing, so nothing gets exposed on the host.
With a DNS-01 challenge (explained in Step 6), even private hostnames that point to a Tailscale IP get a valid certificate. My Dokploy panel itself works this way, on a hostname that resolves only to a Tailscale IP.
Git push to production
For GitHub, auto deploy works without any extra setup. For GitLab, Bitbucket, Gitea and Docker Hub, Dokploy gives you a webhook URL, and there is an API if you want to trigger deployments from a CI pipeline.
A few more things I find useful here:
- Preview deployments for pull requests
- Rollbacks to an earlier deployment
- Watch paths, so a monorepo redeploys only when files in a particular folder change
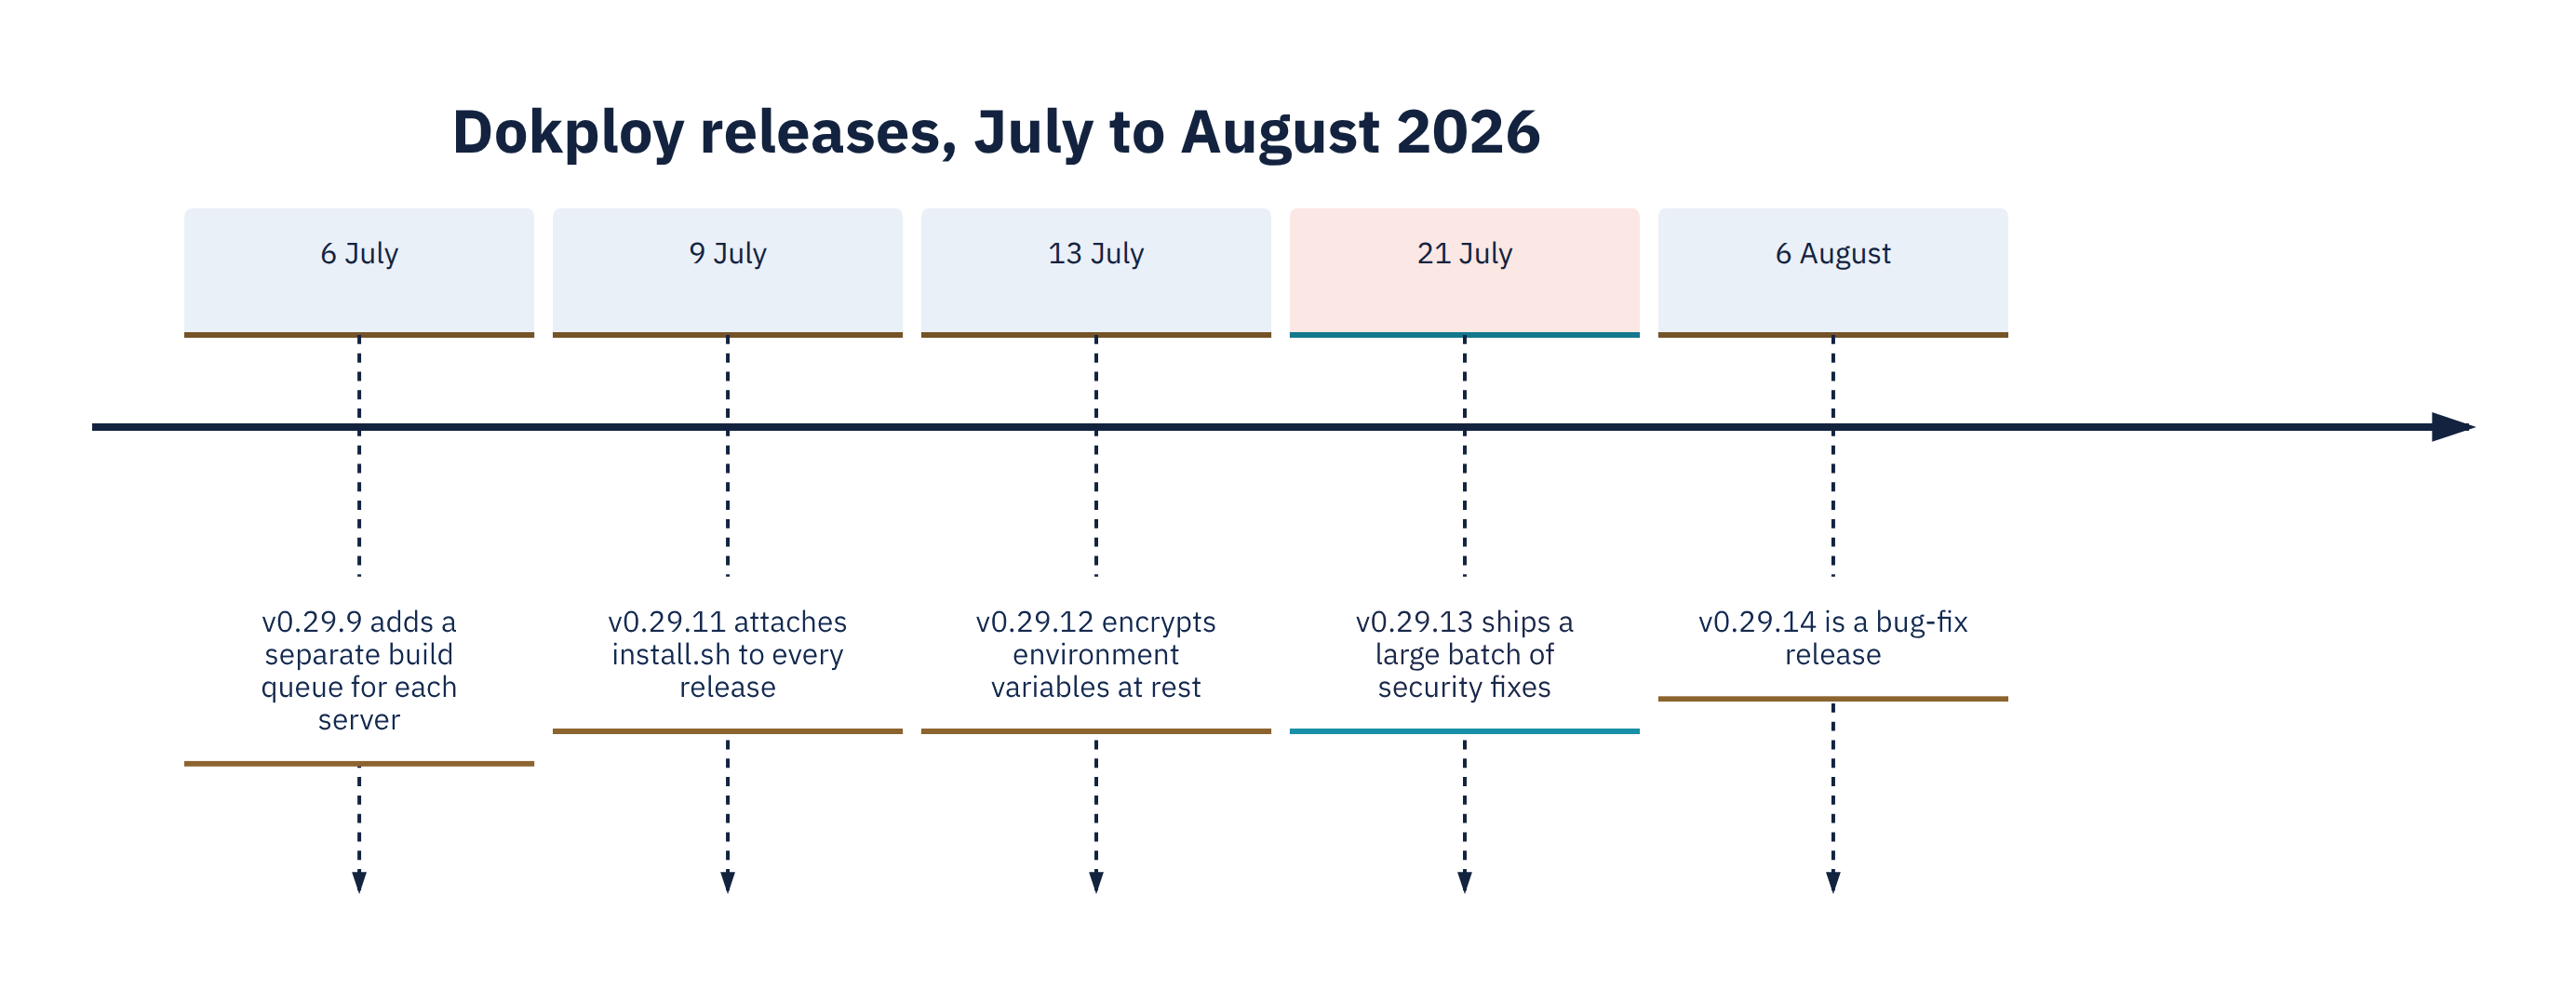
- A separate build queue for every server, with configurable concurrency (from v0.29.9)
Docker Compose works the way you expect
Almost every self-hosted tool ships with a docker-compose.yml. In Dokploy you paste it, add a domain and redeploy. Keep in mind that a regular Compose deployment and a Swarm stack deployment do not behave the same way, especially for Traefik labels and routing. You still get logs, a terminal and resource graphs for each service. There is also a template catalogue (n8n, Uptime Kuma, a Docker registry and many more) and a built-in AI assistant that can draft a Compose template for you.
Databases and backups in the same place
PostgreSQL, MySQL, MariaDB, MongoDB and Redis are a few clicks away, and their backups can go to any S3-compatible bucket on a cron schedule. For SQLite files, uploads or app workspaces, there are Volume Backups. Dokploy can also back up itself, meaning its own PostgreSQL database and /etc/dokploy, which is very handy when you want to shift everything to a new server.
It grows with you
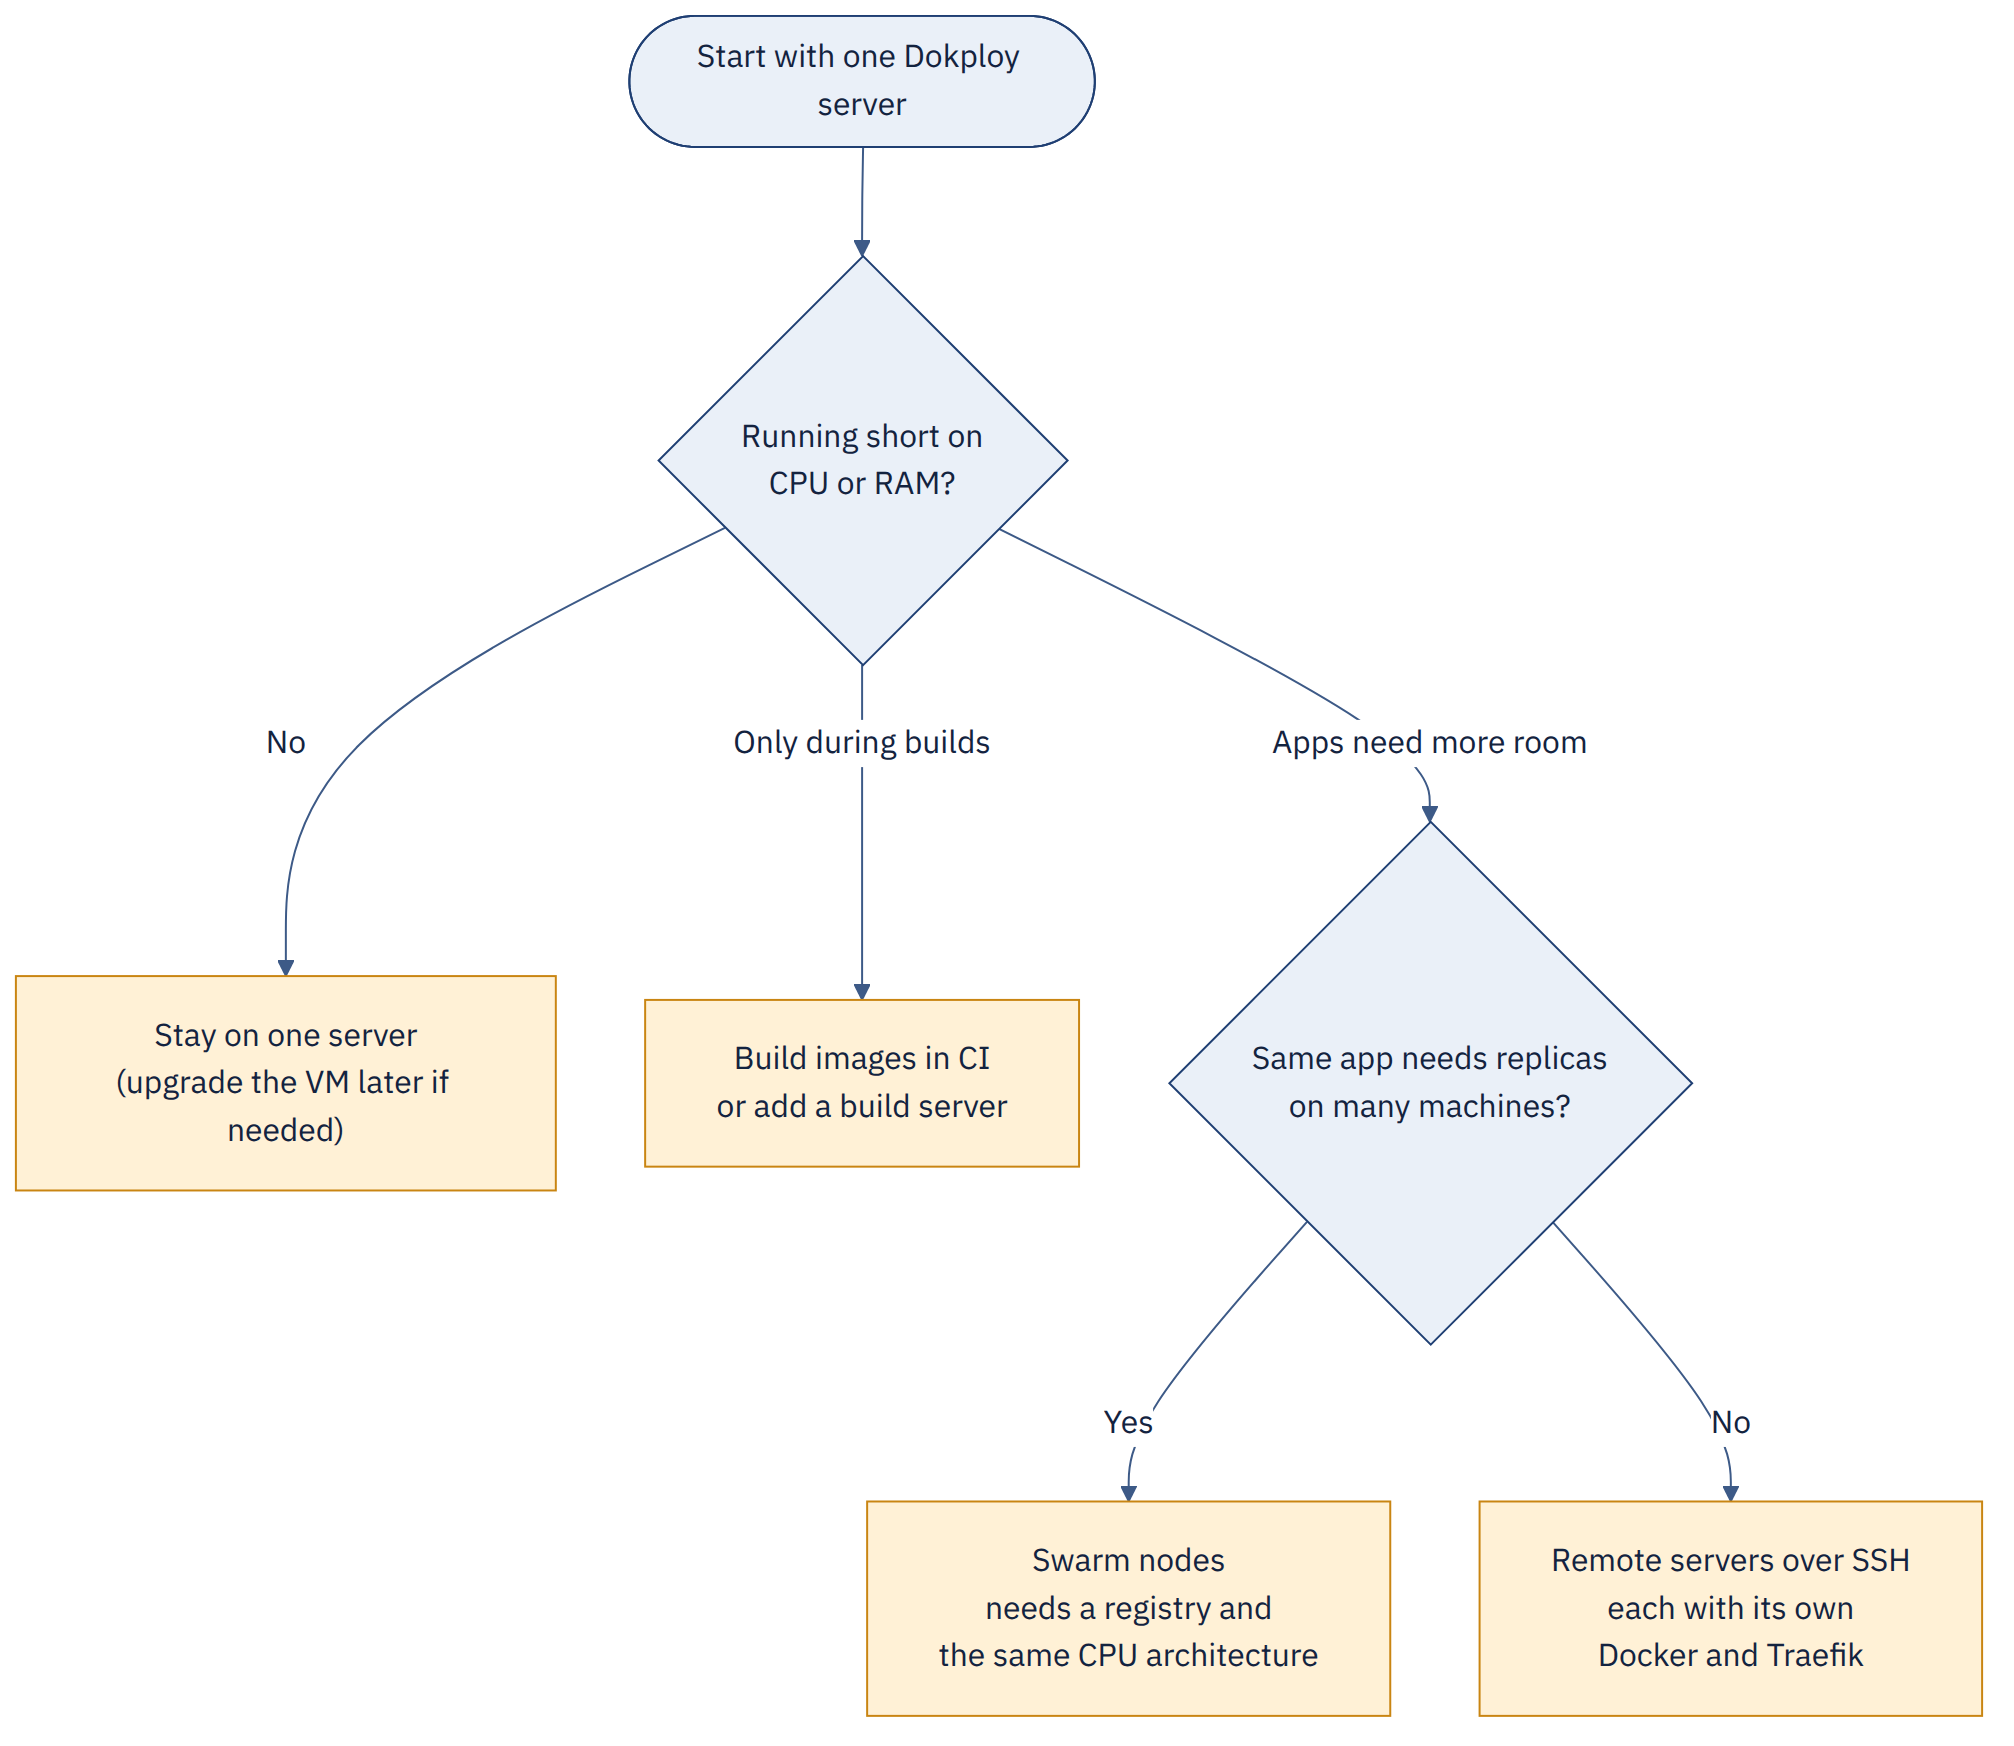
Start with one server. Later you can attach remote servers over SSH, add a separate build server or join Swarm nodes to run replicas. The official docs give a simple way to decide, and I have put it into a flow below.
Daily operations are taken care of
Real-time logs, a terminal in the browser, deployment history, notifications (Slack, email, webhooks and more), scheduled jobs, and an official CLI, SDK and MCP server. From v0.29.12, environment variables are encrypted at rest. You also get 2FA and passkeys, with Owner, Admin and Member roles.
Licence and pricing
In 2026, Dokploy moved its core to the standard Apache 2.0 licence. Enterprise features such as SSO (OIDC or SAML), SCIM provisioning, custom roles, audit logs and white-labelling need a licence key.
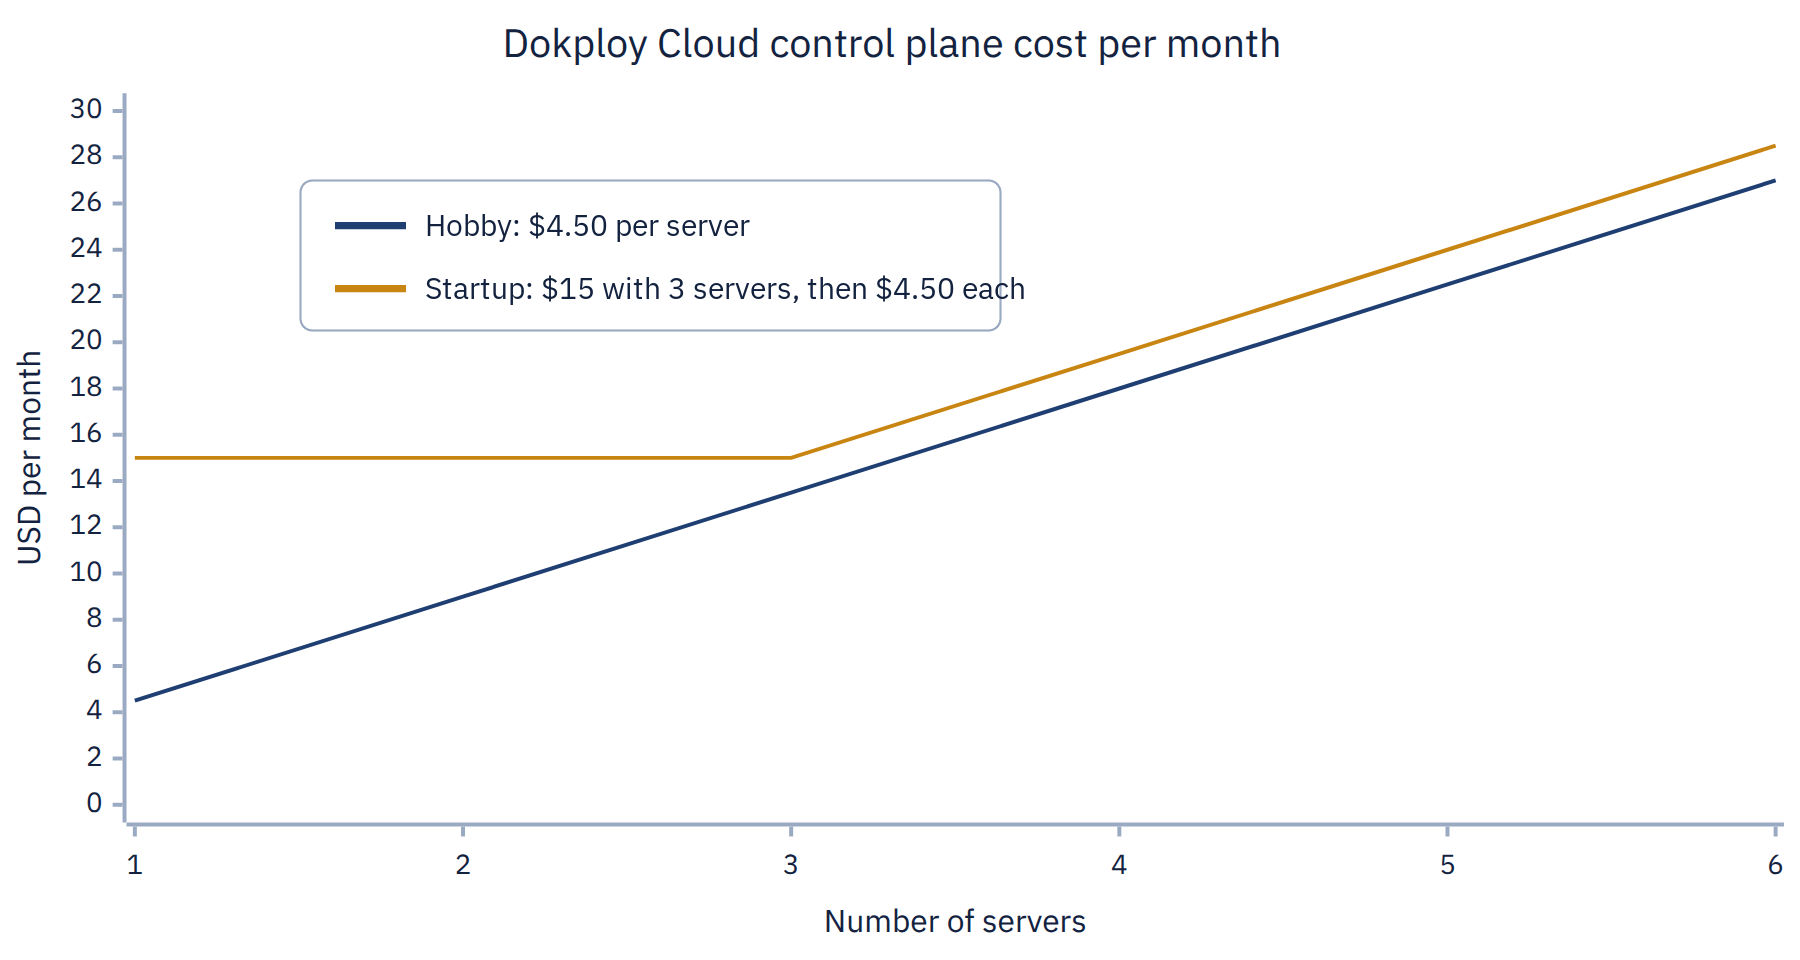
If you do not want to maintain the dashboard yourself, there is Dokploy Cloud. They host the control plane, and your apps still run on your own servers. Pricing starts at $4.50 per server per month.
Trade-offs you should know before starting
Dokploy is good, but please remember that self-hosting does not remove work. The work simply becomes yours. Here is what I would tell anyone who is starting out.
You are the platform team now. OS patches, Dokploy upgrades (these are manual on self-hosted), disk space, backups and restores are all your responsibility.
Builds are heavy. Running Nixpacks or Docker builds on a small server can slow down, or even freeze, everything else running on it. The official production guide itself recommends building images in CI and letting the server only pull and run them.
Updates matter. Dokploy moves fast. July 2026 alone had five releases, and v0.29.13 (21 July) fixed a big batch of command-injection and authorisation issues. An outdated panel that is reachable from the internet is a real risk.
Docker can bypass UFW. Docker's iptables rules can allow published container ports to bypass some UFW filtering rules. Treat OCI security lists or NSGs as an important external boundary, and verify the actual exposure of every published port. If you rely on UFW, review Docker-compatible firewall configurations and test them rather than assuming that UFW alone blocks container traffic.
A quick check from another machine (not the server itself) shows what is really reachable:
# Run from your laptop or another server, not from the Dokploy host
nmap -Pn -p 22,80,443,3000,2377,7946,8080 <public-server-ip>
# Only 80 and 443 (and 22 from your own IP) should show as "open"
Monitoring is basic. Self-hosted gives you per-service graphs and logs. The advanced monitoring dashboard is part of Dokploy Cloud. If you need history and alerts, send your logs to a separate system.
Before you install
| Requirement | Details |
|---|---|
| Server | Linux VM with at least 2 GB RAM and 30 GB disk, more if you plan to build on it. Ubuntu 22.04/24.04 LTS or Debian 12 match the tested distributions and Dokploy's automated server security checks. |
| Free ports | 80 and 443 for Traefik, 3000 for the dashboard |
| Access | Root or sudo over SSH. Do not install inside a container (Proxmox LXC is detected and handled by the script). |
| DNS | A domain you control. With Cloudflare, DNS-01 certificates are very easy to set up. |
| Optional | A Tailscale account for private access, an S3-compatible bucket for backups and a container registry (GHCR, Docker Hub or OCIR) for CI-built images |
With the standard installer, ports 80, 443 and 3000 must be available to Dokploy's services. Published-port configuration can differ with other installation options, so check the installation docs for the version you install.
Two points from my own experience:
- Port conflicts. The standard installer fails if 80, 443 or 3000 are already in use. My older production VM already had nginx-proxy on 80 and 443, so I installed Dokploy on a separate instance rather than fighting over ports.
- ARM64 images. Dokploy runs well on ARM64 servers like OCI Ampere, but every image you deploy must be built for
linux/arm64or be multi-arch. Otherwise the container fails withexec format error.
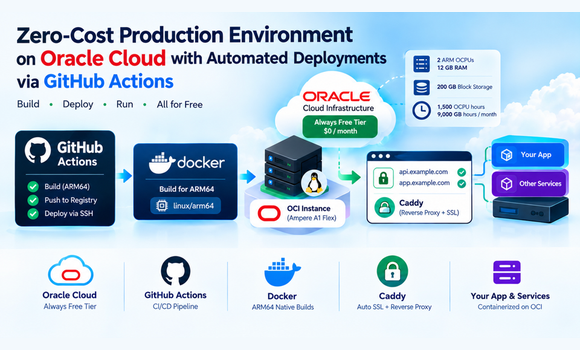
If you are starting with a fresh Oracle Cloud account, my guide to building a free production infrastructure on Oracle Cloud covers the OCI networking and Always Free ARM64 setup that this article builds on.
Step-by-step setup
Below is the full plan. Steps 2 and 8 are optional.

Step 1: Prepare the server and the firewall
Update the system and make sure the required ports are free:
sudo apt update && sudo apt upgrade -y
sudo apt install -y curl
sudo ss -tlnp | grep -E ':(80|443|3000)\b' || echo "Ports 80, 443 and 3000 are free"
On your cloud firewall (security list or NSG in OCI), allow:
- SSH (22) only from your own IP
- 80 and 443 from anywhere, if you will host public sites
- 3000 only from your IP, and only till the panel gets its own domain
Never open the Swarm ports (2377, 7946 and 4789) to the internet.
On OCI, if a port is still not reachable, check both layers: the VCN security list (or NSG) and the firewall inside the instance (iptables on Ubuntu images, firewalld on Oracle Linux). I have been caught by the second one before, where the port was open in the security list but the instance's own iptables rules were still blocking it.
Step 2 (optional): Join the server to your tailnet
If you want private access to the panel or to private websites such as display.example.com, install Tailscale before Dokploy:
curl -fsSL https://tailscale.com/install.sh | sh
sudo tailscale up --ssh
sudo tailscale ip -4    # note down the 100.x.y.z address
Before you tighten any firewall rule, confirm that you can SSH into the server using this Tailscale IP.
Step 3: Install Dokploy
curl -sSL https://dokploy.com/install.sh | sudo sh # use "| sh" if you are logged in as root
curl -sSL https://dokploy.com/install.sh -o dokploy-install.sh
less dokploy-install.sh        # review before running
sudo sh dokploy-install.sh
The script installs Docker if needed, initialises Swarm, creates dokploy-network and deploys Dokploy. A few variations are good to know:
# sudo resets the environment, so pass variables inline. Exporting them first will not work.
# Set the Swarm advertise address explicitly (mainly useful for multi-node setups):
curl -sSL https://dokploy.com/install.sh | sudo ADVERTISE_ADDR=100.x.y.z sh

# If the default Swarm address pool overlaps with your VPC/VCN subnets, pick another pool:
curl -sSL https://dokploy.com/install.sh | \
  sudo DOCKER_SWARM_INIT_ARGS="--default-addr-pool 172.20.0.0/16 --default-addr-pool-mask-length 24" sh

# Install an exact release. Every GitHub release has its own install.sh:
curl -sL https://github.com/Dokploy/dokploy/releases/download/v0.30.6/install.sh | sudo sh
For a single-node installation, Dokploy's automatic address detection is usually sufficient. If you plan to add Swarm nodes, explicitly configure ADVERTISE_ADDR to an IP address that every node can reliably reach. A Tailscale address may be suitable for a tailnet-based cluster, but test node-to-node connectivity before using it in production, and remember that the cluster depends on Tailscale staying up.
Check that everything is up:
docker ps --format 'table {{.Names}}\t{{.Status}}'
You should see Dokploy, its PostgreSQL and Redis, and a container named dokploy-traefik.
Step 4: Create the admin account
Open http://<server-ip>:3000 (or http://100.x.y.z:3000 over Tailscale) and register. This first account controls the whole instance, so please enable 2FA or a passkey on it immediately.
Step 5: Create DNS records before adding domains
Point your hostnames to the server before adding them in Dokploy. If you add the domain first, the certificate may not get issued till you recreate the domain or restart Traefik.
deploy.example.com   A   <public server IP>    # panel (or 100.x.y.z if it will be private)
app.example.com      A   <public server IP>    # a public application
display.example.com     A   100.x.y.z             # a tailnet-only website (see Step 8)
If the Cloudflare proxy (the orange cloud) is on for a record, keep the SSL/TLS mode as Full (Strict).
Step 6: Switch certificates to DNS-01
If you use Cloudflare, this is the step I recommend the most.
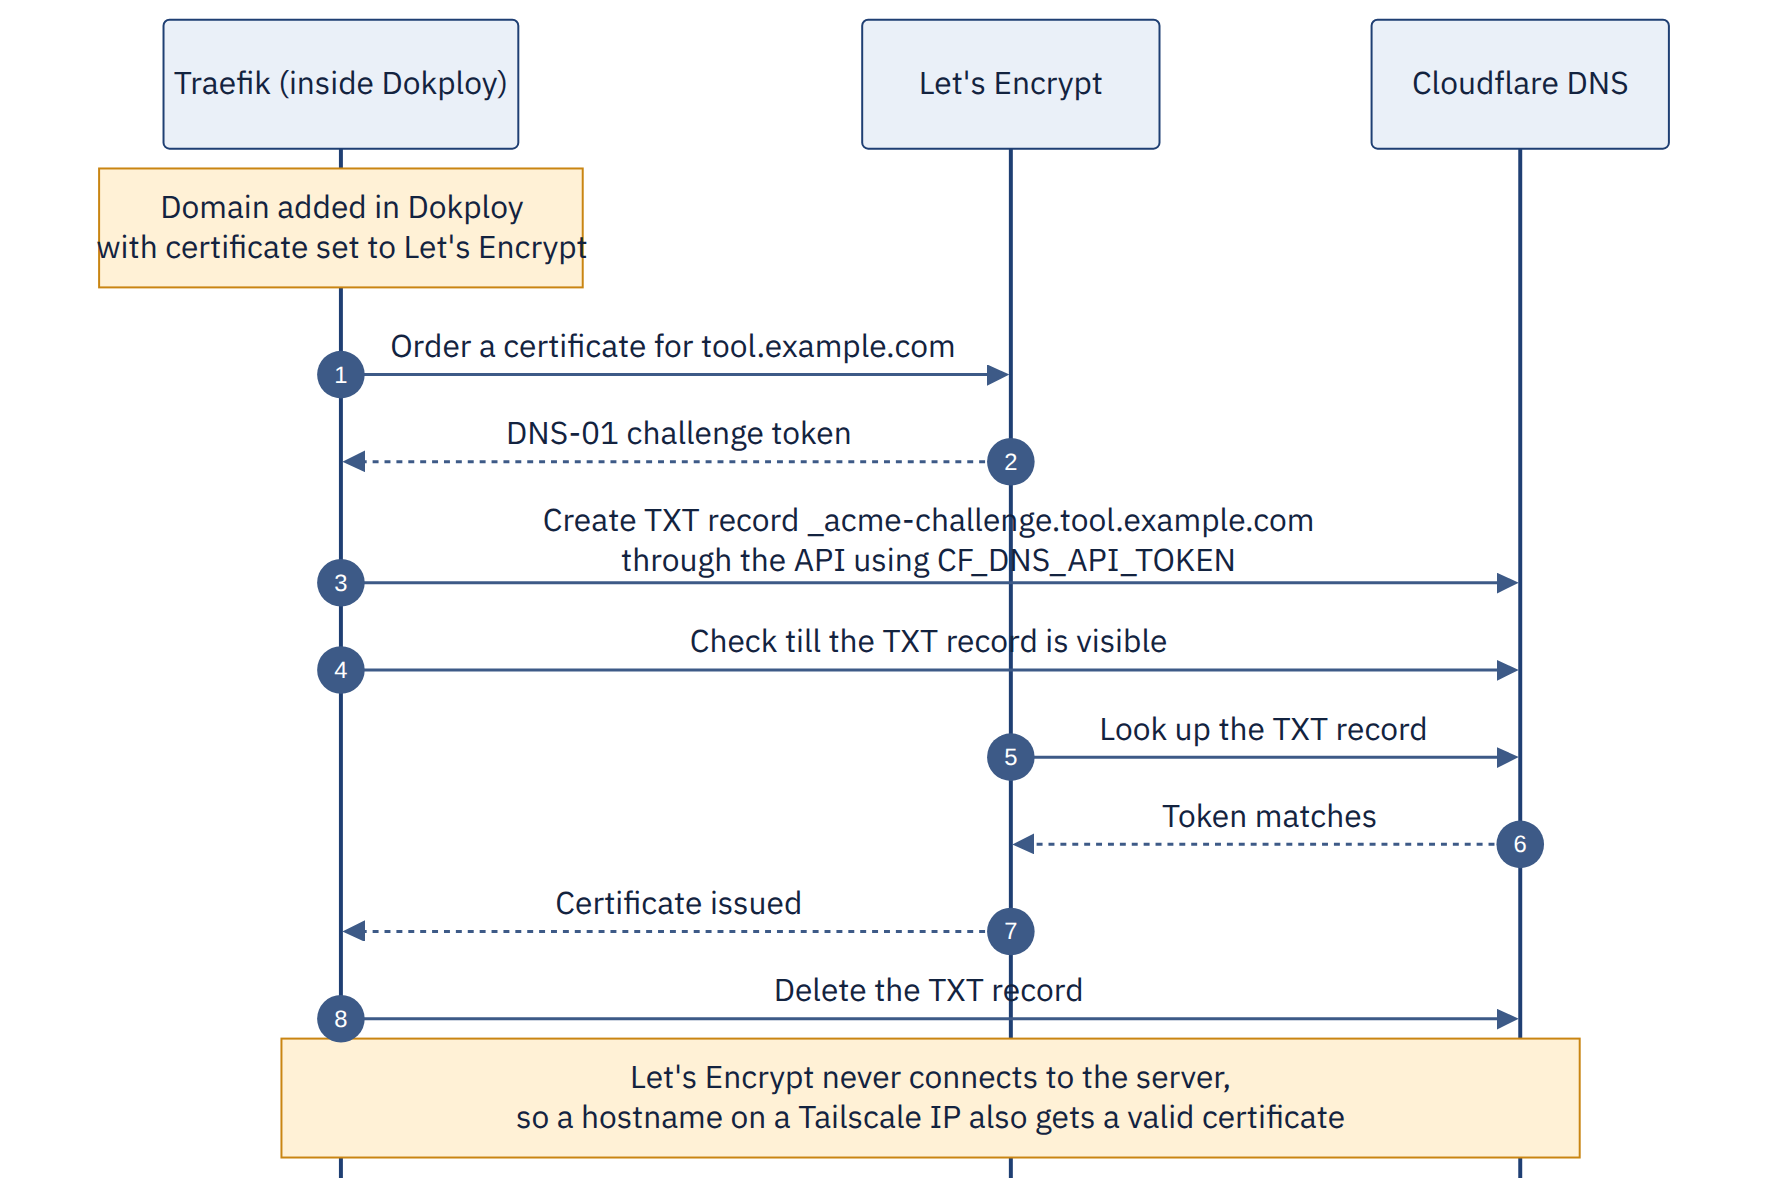
By default, Let's Encrypt uses the HTTP-01 challenge, and for that it has to reach port 80 on a public IP. With DNS-01, Traefik proves that you own the domain by creating a temporary TXT record through the Cloudflare API. Let's Encrypt never connects to your server, so the same resolver works for public hostnames, proxied hostnames and private hostnames on a Tailscale IP. Do this before adding domains, especially if the panel itself will be private.
1. Create a Cloudflare API token with Zone > DNS > Edit permission, limited to your zone.
2. Give the token to Traefik. In the Web Server > Traefik settings, add the environment variable below and restart Traefik. Please note, saving alone is not enough. Traefik picks up the variable only after a restart.
CF_DNS_API_TOKEN=<your-token>
3. Change the challenge type of the default resolver in traefik.yml. You can edit it from the Traefik file system view in the dashboard. On disk, it is /etc/dokploy/traefik/traefik.yml:
certificatesResolvers:
  letsencrypt:                   # keep this name, every router Dokploy generates uses it
    acme:
      email: [email protected]
      storage: /etc/dokploy/traefik/dynamic/acme.json
      dnsChallenge:
        provider: cloudflare
        resolvers:
          - "1.1.1.1:53"
          - "1.0.0.1:53"
I have kept the resolver name as letsencrypt, and that is the important part. Every router that Dokploy generates already refers to this name, so every domain where you select Let's Encrypt now uses DNS-01 automatically. No second resolver, no extra labels. In my setup, this single resolver issues certificates for the public sites as well as the Tailscale-only panel.
Restart Traefik and watch its logs:
docker logs --tail 100 dokploy-traefik 2>&1 | grep -iE 'acme|error'
Step 7: Put the panel on HTTPS and close port 3000
In the Web Server settings, set the server domain (for example deploy.example.com), enable HTTPS with Let's Encrypt and save. Then check the certificate from your laptop:
curl -vI https://deploy.example.com 2>&1 | grep -iE 'subject:|issuer:|expire date'
If the issuer is Let's Encrypt, you are good. If the subject shows TRAEFIK DEFAULT CERT, Traefik could not attach the certificate, and its logs will tell you why.
Once HTTPS works, and only after that, stop publishing port 3000:
docker service update --publish-rm "published=3000,target=3000,mode=host" dokploy
Post that, remove the temporary port 3000 rule from your cloud firewall.
Step 8 (optional): Private websites with Tailscale
Some things should never be public, like an internal display dashboard, database consoles, monitoring dashboards and admin panels. With Tailscale and DNS-01 you can still give them proper hostnames such as display.example.com and valid HTTPS.
In my setup, Tailscale lets me reach selected applications privately through hostnames such as display.example.com. These hostnames resolve to the server's Tailscale IP, and the applications are protected with network restrictions and a Traefik allow-list middleware. A private DNS record alone is not enough to secure an application.
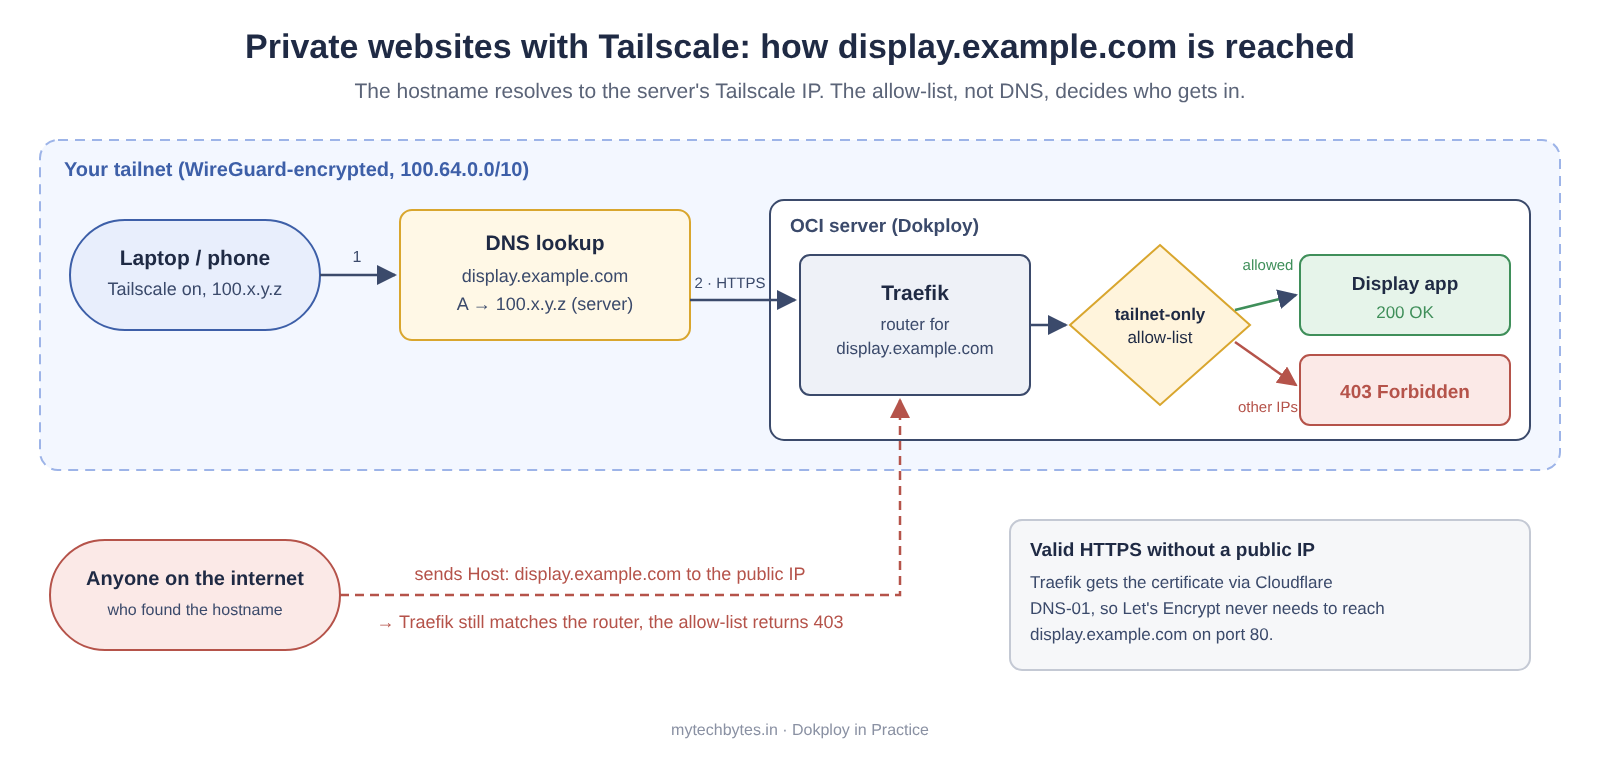
Configure display.example.com
Point the hostname to the Tailscale IP. You can use split DNS on the tailnet (a DNS server such as dnsmasq answering for your domain, configured in Tailscale's DNS settings), or simply create an A record that points to the 100.x.y.z address. Nobody outside your tailnet can reach that IP anyway.
Add the domain in Dokploy with HTTPS and Let's Encrypt. Because of DNS-01, the certificate gets issued even though the hostname does not point to the public IP. Dokploy may show a warning like this:
Domain resolves to 100.x.y.z but should point to <public server IP>
I got this exact warning for my CloudBeaver hostname. For a private hostname it is expected, and the certificate still got issued. Verify with curl rather than going by the warning.
Now the part that is easy to miss: a hidden hostname is not access control. Traefik listens on all interfaces and chooses the router based on the hostname, not on which interface the request came in from. If the same server also hosts public sites, anyone can send your private hostname to the public IP and Traefik will route the request. The hostname is not really a secret either, because every Let's Encrypt certificate is published in Certificate Transparency logs.

Configure Traefik access controls
The fix is an IP allow-list middleware. Create /etc/dokploy/traefik/dynamic/tailnet-only.yml (Traefik watches this folder):
http:
  middlewares:
    tailnet-only:
      ipAllowList:
        sourceRange:
          - "100.64.0.0/10"          # Tailscale IPv4
          - "fd7a:115c:a1e0::/48"    # Tailscale IPv6
Then attach tailnet-only@file to the routers of that tool:
- Application: add it to the
middlewareslist of the generated routers under Advanced > Traefik. Re-check it after editing the domain, because Dokploy regenerates this file. - Docker Compose: add a label on the websecure router that Dokploy generates for the domain, then redeploy. You can see the exact router name in Preview Compose. If you delete and re-add the domain, the name can change, so update the label too.
labels:
  - traefik.http.routers.<generated-websecure-router>.middlewares=tailnet-only@file
Now test from a machine that is not on your tailnet. A laptop on a mobile hotspot, with Tailscale switched off, works well for this:
curl -s -o /dev/null -w '%{http_code}\n' \
  --resolve display.example.com:443:<public-server-ip> https://display.example.com/
# 403 means the allow-list works. 200 or a redirect means the tool is still public.
If you do not want to deal with middleware, keep private tools on a separate server (or a Dokploy remote server) with ports 80 and 443 closed on the cloud firewall. Then the only way to reach them is through Tailscale.
Step 9: Deploy your first application
There are two ways to do this.
The quick way: build from Git. Create a project, add an Application, connect GitHub (or give a Git URL), then select the branch and build type. Nixpacks and Railpack work without any config, while a Dockerfile gives you full control. Add environment variables and deploy. After that, open the Domains tab, enter the hostname and the port your app listens on inside the container, and turn on HTTPS.
One common problem: your app must listen on 0.0.0.0, not 127.0.0.1, otherwise Traefik returns Bad Gateway. Vite and similar tools listen only on localhost by default, so do check this.
The production way: build in CI, deploy an image. For anything serious, keep builds away from your server. Build and push the image from CI, point a Dokploy Application to that image (add registry credentials in Dokploy if the registry is private) and trigger the deployment through the API. My legacy Laravel app is deployed this way, from an image built on GitHub.
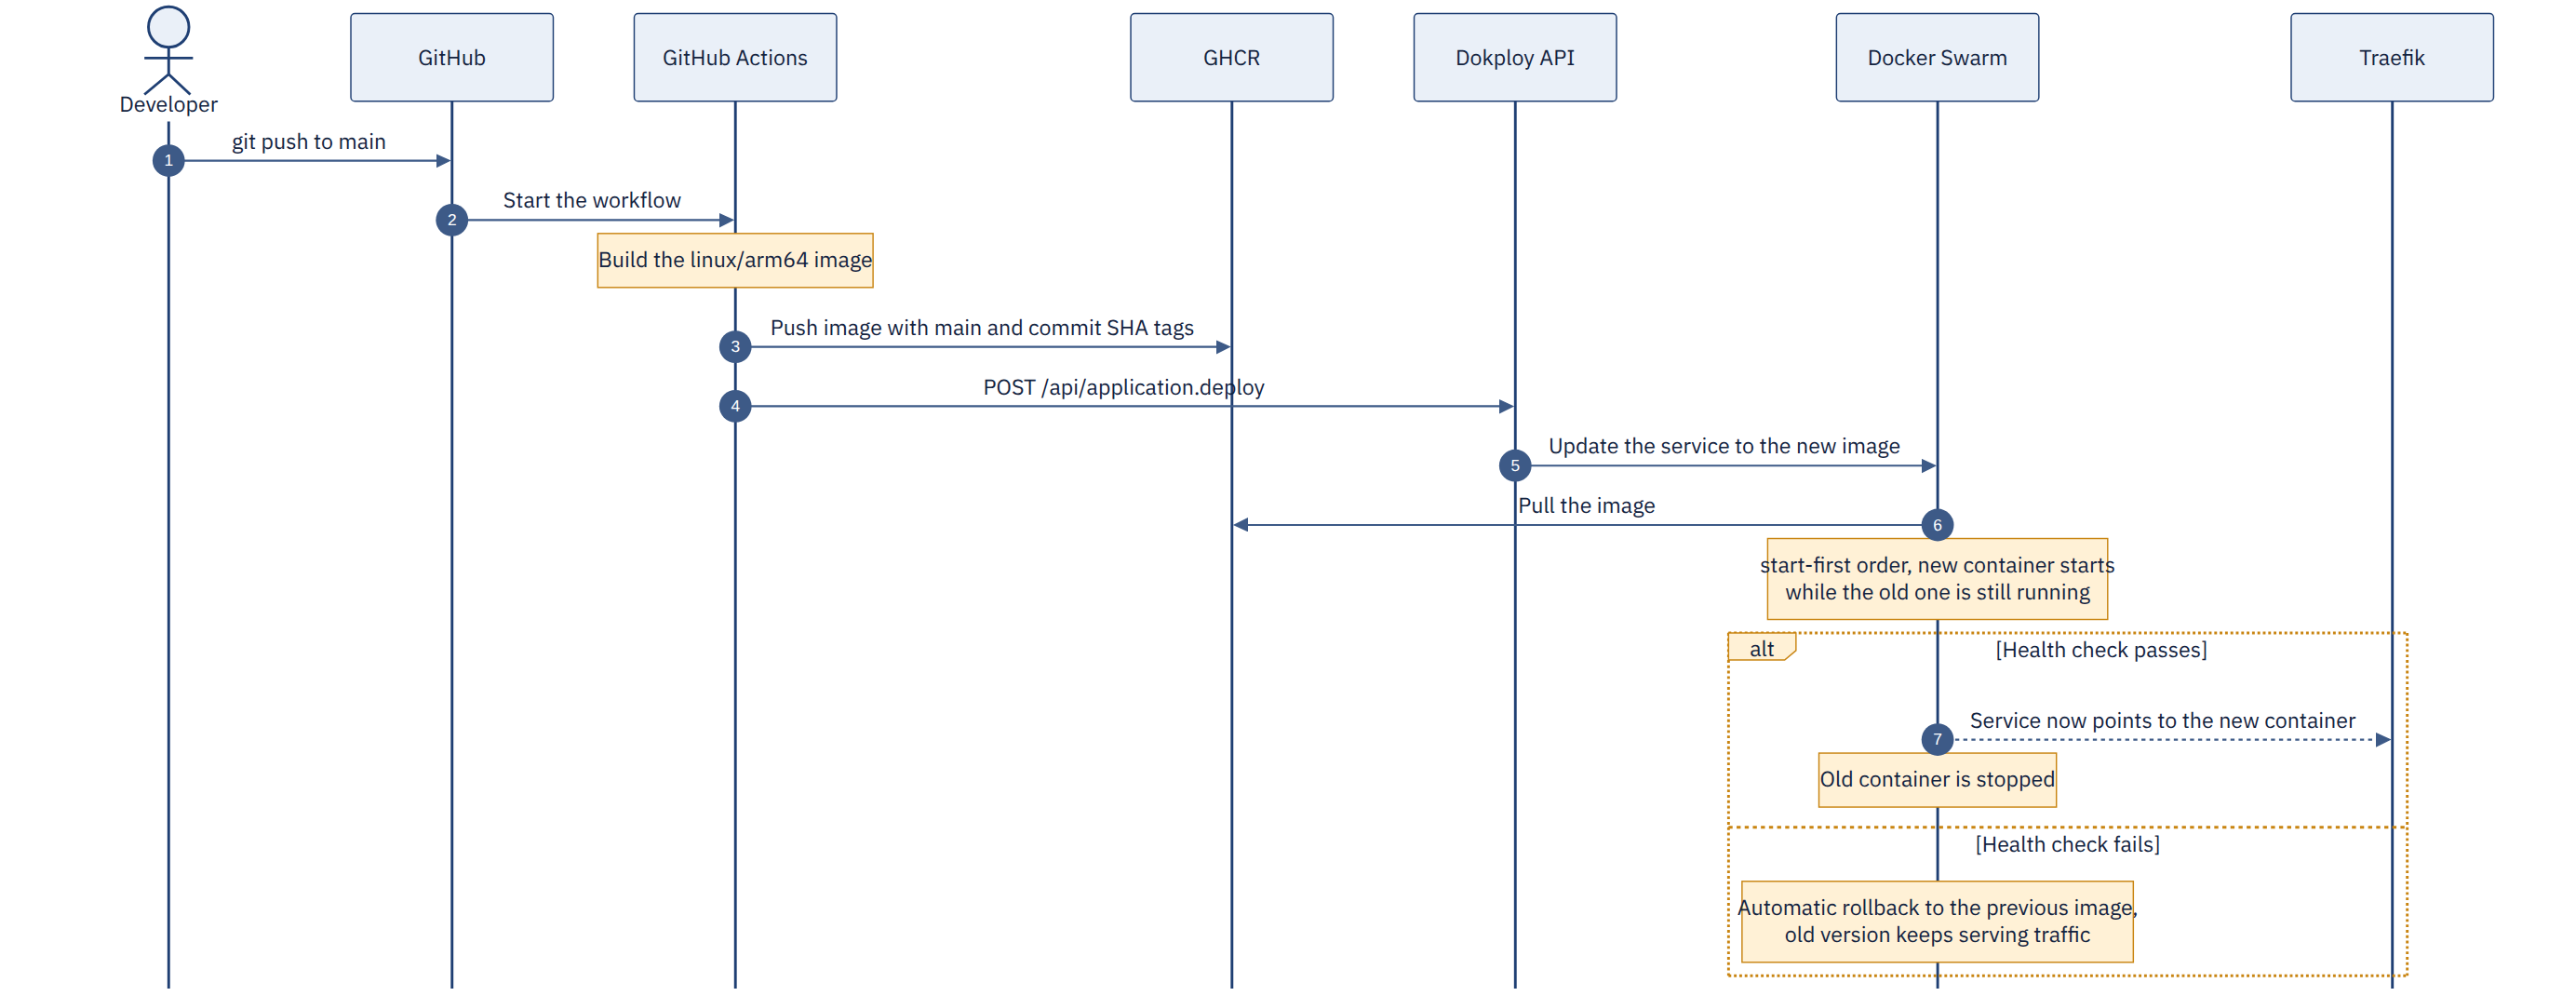
Here is a GitHub Actions workflow for an ARM64 server:
# .github/workflows/deploy.yml
name: build-and-deploy
on:
  push:
    branches: [main]

jobs:
  build-and-deploy:
    runs-on: ubuntu-latest
    permissions:
      contents: read
      packages: write
    steps:
      - uses: actions/checkout@v4
      - uses: docker/setup-qemu-action@v3
      - uses: docker/setup-buildx-action@v3
      - uses: docker/login-action@v3
        with:
          registry: ghcr.io
          username: ${{ github.actor }}
          password: ${{ secrets.GITHUB_TOKEN }}
      - uses: docker/build-push-action@v6
        with:
          context: .
          platforms: linux/arm64          # linux/amd64 for x86 servers
          push: true
          tags: |                          # registry paths must be lowercase
            ghcr.io/your-org/your-app:main
            ghcr.io/your-org/your-app:${{ github.sha }}
      - name: Trigger Dokploy deployment
        run: |
          curl -fsS -X POST "${{ secrets.DOKPLOY_URL }}/api/application.deploy" \
            -H "Content-Type: application/json" \
            -H "x-api-key: ${{ secrets.DOKPLOY_API_KEY }}" \
            -d '{"applicationId": "${{ secrets.DOKPLOY_APP_ID }}"}'
Create the API token from your Dokploy profile settings and give it an expiry date. If your panel is reachable only over Tailscale, a GitHub-hosted runner cannot call it. In that case, first join the runner to your tailnet, for example using Tailscale's official GitHub Action.
Next, add a health check and automatic rollback under Advanced > Cluster Settings > Swarm Settings. A few points to note: durations are in nanoseconds, this particular check needs curl inside the image, and if the health check itself is wrong, the service never becomes healthy. So test the endpoint first.
Health check:
{
  "Test": ["CMD", "curl", "-f", "http://localhost:3000/health"],
  "Interval": 30000000000,
  "Timeout": 10000000000,
  "StartPeriod": 30000000000,
  "Retries": 3
}
Update config:
{
  "Parallelism": 1,
  "Delay": 10000000000,
  "FailureAction": "rollback",
  "Order": "start-first"
}
With start-first, a correctly configured health check and sufficient resources, Docker Swarm can start the new task before stopping the old one. This can reduce or eliminate downtime during deployments. The rollback configuration provides a recovery mechanism for certain failed updates, but it is not a guarantee: database migrations, startup time, replica count and resource limits all matter, so test it with your application's actual failure scenarios.
Step 10: Add a database and connect your app
Create a Database service, choose the engine and deploy. Pin the major version (for example mysql:8.4 or postgres:17) instead of a moving tag like latest. When deploying PostgreSQL 18 or another newer major version, verify the official image's data-directory requirements and Dokploy's volume mapping (Advanced tab) before deploying. Do not reuse an existing volume blindly across major versions, and take a tested backup before making the change. My own PostgreSQL 18 story is in the use cases below.
Use the internal connection details shown by Dokploy, where the host is the service name on dokploy-network. Keep the external port disabled unless you really need it, and if you do, restrict it with a firewall rule or use Tailscale.
DB_HOST=<internal host shown by Dokploy>
DB_PORT=5432
DB_DATABASE=app
DB_USERNAME=app
DB_PASSWORD=<generated password>
After redeploying the app, check that the values actually reached the container:
docker ps --filter "name=<app-name>" --format '{{.Names}}'
docker exec -it <container-name> env | grep '^DB_'
This check helped me once. In one migration, the whole "Connection refused" problem was DB_PORT=3600 instead of 3306, along with a stray colon at the start of DB_HOST. Both were typos in the Environment tab.
docker exec ... env.Step 11: Set up backups, then test a restore
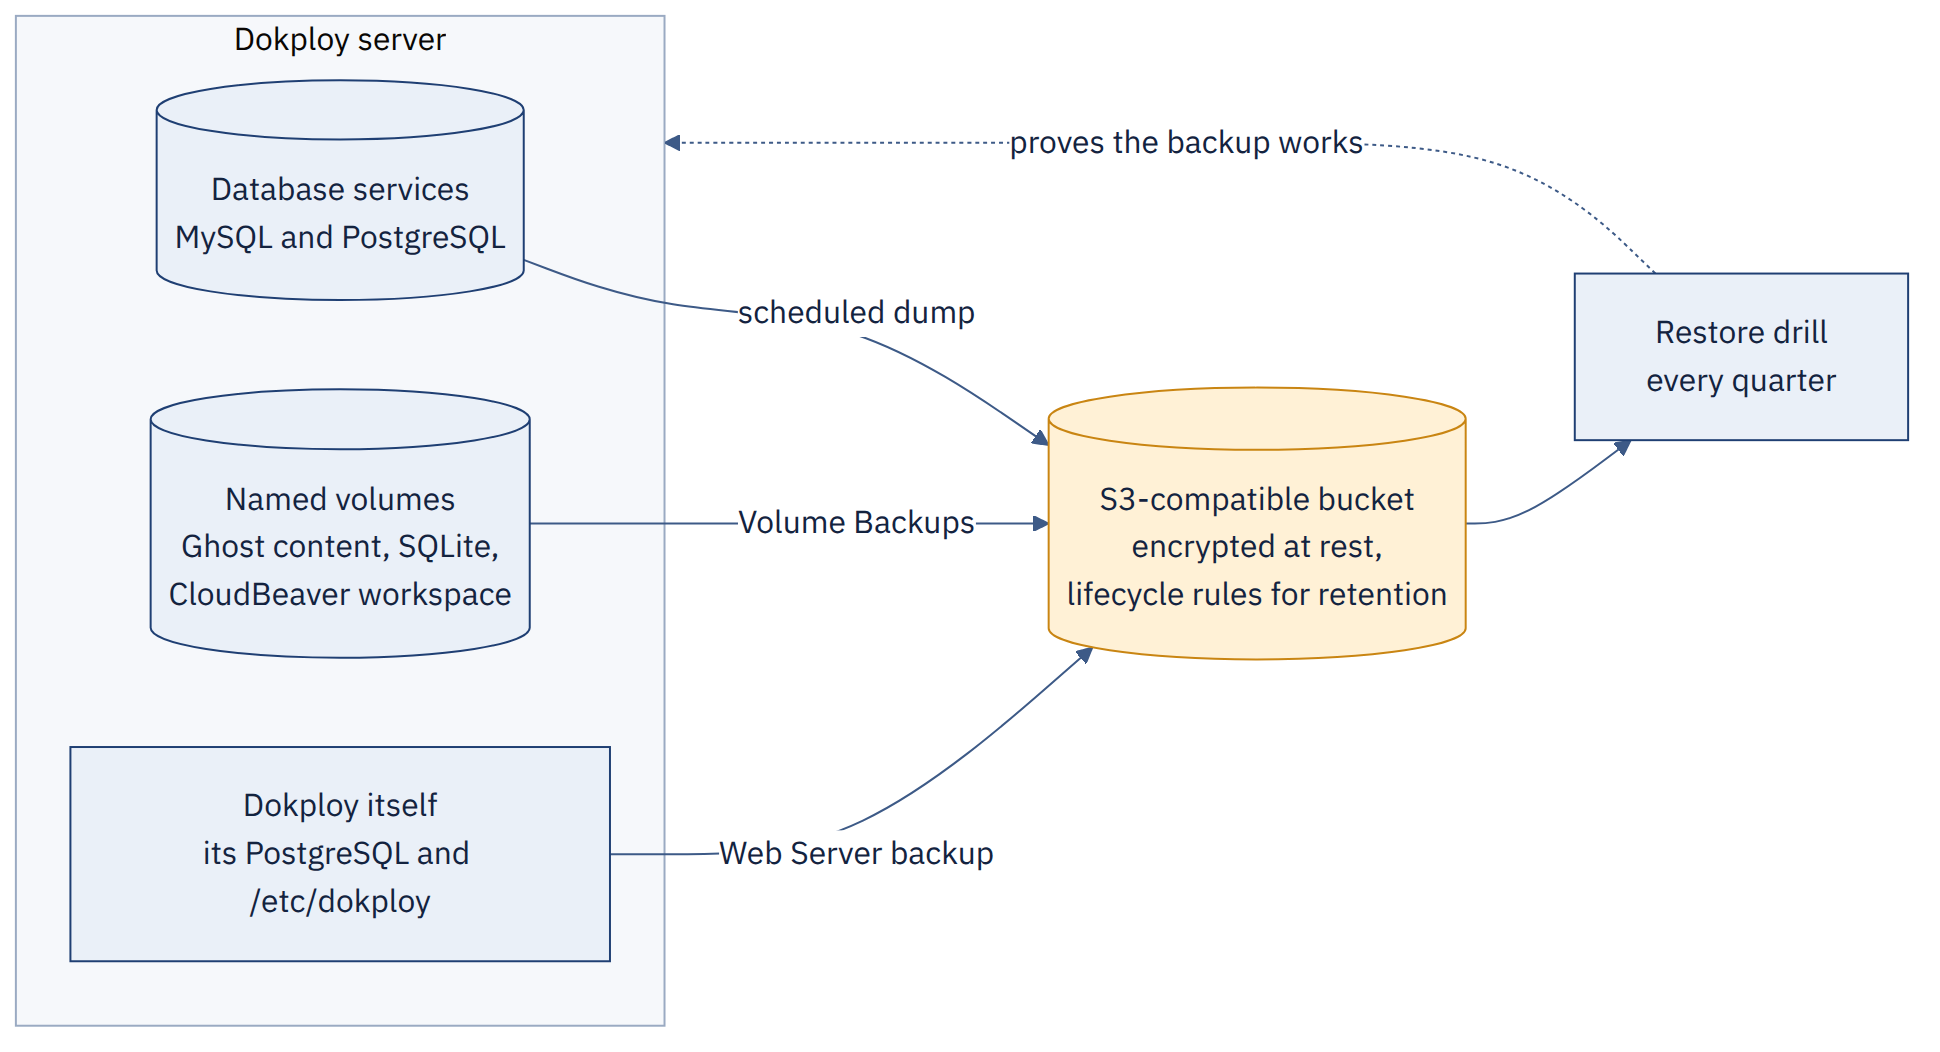
S3 destination. AWS S3, Cloudflare R2, MinIO or any other S3-compatible storage works. OCI Object Storage also has an S3-compatible API, so it is worth trying as a destination. Use credentials that can access only one bucket and enable server-side encryption on that bucket. In the version I use, the backup archives themselves are not encrypted client-side, so verify this for your version and add your own encryption if the data is sensitive. For retention, use lifecycle rules on the bucket.
Database backups. Schedule them from each database's Backups tab using a cron expression.
Volume Backups. Use these for anything stored in named volumes, like SQLite files, uploads, CMS content and tool workspaces. You can choose to stop the container during the backup, which gives a consistent copy at the cost of a few seconds of downtime. Bind mounts are not supported, so keep important data in named volumes.
Dokploy itself. Go to Web Server > Backups. The archive has Dokploy's PostgreSQL database and /etc/dokploy. If you restore on a new server, update the server IP in Dokploy's settings and in your DNS records.
Restore drill. Do it at least once a quarter. A backup that you have never restored is only a hope.
For manual restores, use the native database clients. I learnt this the hard way when I tried restoring a mysqldump file through CloudBeaver's SQL editor and got this:
SQL Error [1064] [42000]: You have an error in your SQL syntax ... near
'SET @OLD_CHARACTER_SET_RESULTS=@@CHARACTER_SET_RESULTS */; /*!40101 SET @OLD_COL' at line 8
The editor was splitting the version comments inside the dump file wrongly. The mysql client has no such problem:
# MySQL: the shell reads dump.sql on the host and streams it into the container
# (MariaDB 11+ images ship the client as "mariadb" instead of "mysql")
docker exec -i <mysql-container> sh -c 'exec mysql -uroot -p"$MYSQL_ROOT_PASSWORD" app' < dump.sql

# PostgreSQL: restore a custom-format dump
docker exec -i <postgres-container> pg_restore -U postgres -d app --clean --if-exists < app.dump
Step 12: Harden and keep it updated
Update Dokploy regularly, and read the release notes before you do. In the version I run, the Dokploy update does not upgrade Traefik for you, so check the release notes and update Traefik separately when a release asks for it.
curl -sSL https://dokploy.com/install.sh | sudo sh -s update # or "| sh -s update" as root
| Area | What to do |
|---|---|
| Host | Ubuntu or Debian LTS with unattended-upgrades, SSH keys only (root login and password login disabled) and Fail2Ban on SSH |
| Network | Treat the cloud firewall as the source of truth, because Docker-published ports can bypass UFW (install ufw-docker if you rely on UFW). Keep port 3000 and the Swarm ports closed to the public. |
| Dashboard | 2FA or passkeys for every member, least-privilege roles, and a separate API token for each integration, each with an expiry |
| Docker | Enable log rotation, never expose the Docker socket over TCP and pin image tags in production instead of using latest |
| Traefik | HSTS and rate-limit middlewares on public services, the Traefik dashboard kept closed and allow-lists on private routers |
| Data | Internal database credentials only, an encrypted backup bucket and regular restore drills |
| Isolation | Isolated deployments for Compose stacks that should not reach other projects over the shared network |
A minimal log rotation setting for /etc/docker/daemon.json looks like this. It applies to newly created containers, so restart Docker during a maintenance window. The official hardening guide lists a few more daemon settings that are worth a look.
{
  "log-driver": "json-file",
  "log-opts": { "max-size": "10m", "max-file": "3" }
}
Real-world use cases from my setup
Here is how these building blocks are used on my server, along with a few patterns that are common in self-hosted work.
| Use case | Dokploy building blocks | Watch out for |
|---|---|---|
| Blog or CMS (like Ghost) | Compose service (Ghost with MySQL 8), named volumes, Volume Backups, database backups and a Let's Encrypt domain | Back up the content volume and the database. Check that every image has an ARM64 build. |
| API backend with a static frontend on the edge | Application from GitHub or a CI-built image, a domain, environment variables and a health check with rollback | Frontend build-time variables (like VITE_API_URL) belong in the frontend pipeline. Restrict CORS to the frontend domain. |
| Private internal tools (CloudBeaver, Uptime Kuma, n8n) | Compose or Application, DNS-01 certificates, Tailscale and the allow-list middleware | Hidden hostnames can be found. Test access from outside the tailnet. |
| Shared data services | A dedicated project with MySQL and PostgreSQL used by multiple apps through internal hostnames | One database problem can affect many apps. Use a separate database and user for each app. |
| Legacy app migration | Application from a registry image, Environment tab for configuration and a managed MySQL service | SQL mode differences, the exact variable names the app reads and typos in hosts and ports |
| SaaS and client projects | A project for each product or client, production and staging environments, preview deployments and remote servers per client or region | Keep staging data separate and secrets scoped to each environment |
| Scheduled and background jobs | Schedule Jobs and worker Applications without domains | Make jobs safe to re-run, and send failures to a notification channel |
CloudBeaver as a private database console
I run CloudBeaver, the web version of DBeaver, as a Docker Compose service inside a project called Shared Infra. It has a named volume for its workspace and no published host port, and Traefik routes its hostname to container port 8978. The hostname points to the server's Tailscale IP and gets its certificate through the same Cloudflare DNS-01 resolver as the public sites.
From inside the tailnet, CloudBeaver can reach every database on dokploy-network by internal hostname. That is very convenient, and it is also exactly why it needs the allow-list from Step 8.
services:
  cloudbeaver:
    image: dbeaver/cloudbeaver:latest    # pin a specific version in production
    restart: unless-stopped
    environment:
      - CB_SERVER_URL=https://db.example.com
    volumes:
      - cloudbeaver_workspace:/opt/cloudbeaver/workspace
    ports:
      - 8978                             # container port only, never 8978:8978

volumes:
  cloudbeaver_workspace:
Shared MySQL and PostgreSQL for multiple apps
The same Shared Infra project runs MySQL 8 and PostgreSQL 18. Apps in other projects connect to them using the internal hostname over dokploy-network.
PostgreSQL 18 gave me one surprise. When I ran it from a Compose file with the volume mounted at the usual /var/lib/postgresql/data, the container refused to start:
Error: in 18+, these Docker images are configured to store database data in a
       format which is compatible with "pg_ctlcluster" ...
From version 18, the official PostgreSQL image expects the volume at /var/lib/postgresql and creates a version-specific folder inside it. Changing the mount path fixed it for me. Check the volume path under Advanced whenever you pick a PostgreSQL 18 image in Dokploy, and verify it against the image documentation for the exact tag you use. Upgrading from an older major version still needs pg_dump and pg_restore (or pg_upgrade). Swapping the volume will not work.
A legacy Laravel app on MySQL 8
I moved an old Laravel 5.x app to Dokploy as an Application, pulled from an image that GitHub builds, with all its configuration in the Environment tab. After the connection typos were fixed (the DB_PORT story from Step 10), MySQL 8 threw a new error. Some old queries selected non-aggregated columns along with aggregate functions, and MySQL 8's ONLY_FULL_GROUP_BY mode rejects them.
The proper fix is to correct those queries. As a temporary workaround, you can start MySQL with an explicit --sql-mode that leaves out ONLY_FULL_GROUP_BY. Moving an old app to a new platform still means testing it against the new database version.
Ghost for this blog
This blog runs on Ghost, self-hosted in Docker on the same OCI and Dokploy setup. Ghost needs MySQL 8 in production, so the Compose stack is Ghost plus MySQL, each with a named volume. Both volumes should be in Volume Backups, the database should also get its own scheduled dump, and every image in the stack must have an ARM64 build.
An API backend with the frontend on Cloudflare Pages
For my open learning project (a React chat UI with a FastAPI backend), I went with Cloudflare Pages for the frontend and Dokploy for the API, with deployments triggered on push. The server only has to run the API. One catch: Vite bakes VITE_API_URL into the bundle at build time, so that value belongs in the frontend's CI settings and not in Dokploy.
Mistakes and lessons from my setup
Adding my own Traefik label
For CloudBeaver, I added a certresolver label by hand, on a custom router name, while Dokploy was already generating its own routers for that domain. Traefik could not link my extra router to a single service and logged this:
ERR Router cloudbeaver-websecure cannot be linked automatically with multiple Services:
["shared-infra-dbeaver-xxxxxx-1-web" "shared-infra-dbeaver-xxxxxx-1-websecure"]
Requests then got Traefik's default self-signed certificate, and curl failed with SSL certificate problem: unable to get local issuer certificate. Removing the label and redeploying fixed it. Lesson learnt: customise the routers Dokploy generates, and never create new router names for the same service.
Assuming environment variables work the same everywhere
They do not. For an Application, the Environment tab becomes real container variables. For Docker Compose, Dokploy writes a .env file next to the compose file, and your containers see those values only if the compose file uses env_file or ${VAR}.
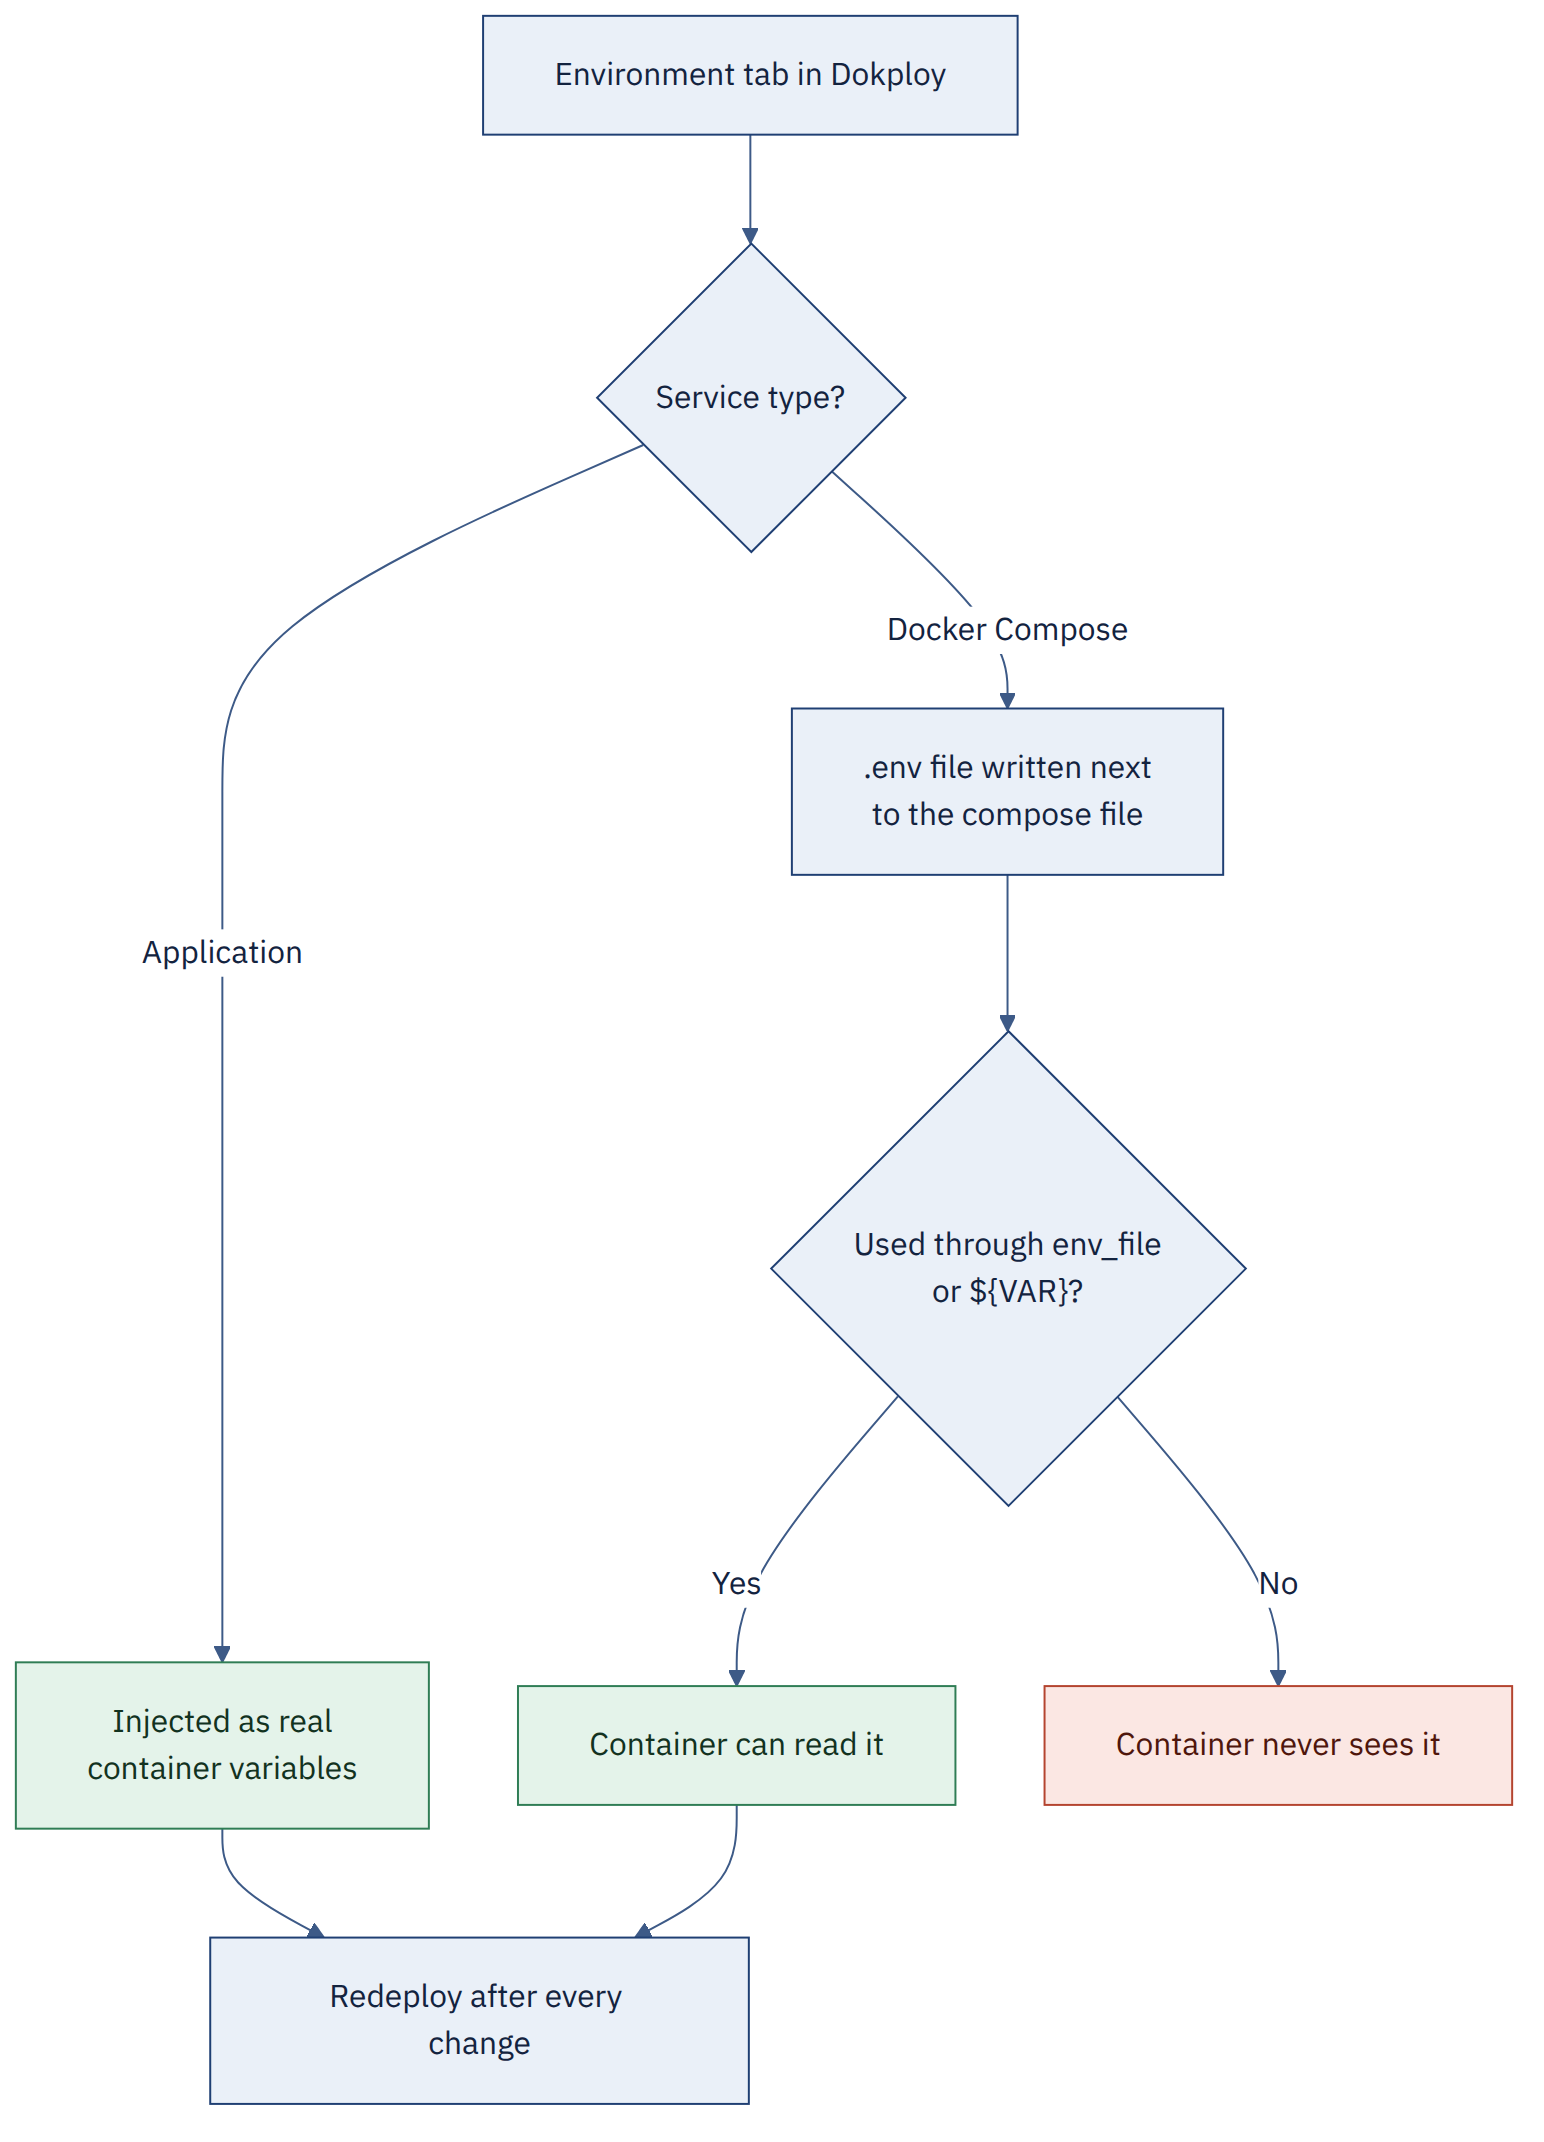
For Laravel there is one more catch. Laravel does not overwrite variables that already exist in the environment, so Dokploy's values win over a .env file baked into the image. But if the image ran php artisan config:cache during the build, the cached config wins over everything. Cache the config when the container starts, not while building the image.
Tunnelling to container IPs
An SSH tunnel to a container's overlay IP looks like an easy way to reach a database, but Swarm overlay IPs are not reliably reachable from the host. For one-off database work, docker exec into the container is the dependable option, as shown in Step 11.
Compose habits from older setups
- Publishing host ports (
8978:8978) for services behind Traefik. Just8978is enough, and it avoids port clashes. - Using bind mounts for data that Volume Backups should cover. Use named volumes instead.
- Absolute host paths in volumes, which get cleaned up during deployments. Use
../filesfor bind mounts, or File Mounts for config files.
When Dokploy is not the right choice
If you need Kubernetes-level features like autoscaling, operators or multi-region failover, go for Kubernetes or a managed platform. If nobody in your team wants to manage servers, Dokploy Cloud or a fully managed PaaS will cost less than the time you would spend on operations. And please do not try it on a 1 GB instance. The documented minimum is 2 GB, and users have reported failed installs below that.
Frequently asked questions
What is Dokploy?
Dokploy is an open-source, self-hostable platform for deploying and managing Docker-based applications, Docker Compose stacks and databases on your own servers, with Traefik handling routing and HTTPS.
Can Dokploy run on Oracle Cloud ARM64 instances?
Yes. Dokploy runs on ARM64 servers such as OCI Ampere instances. The applications and database images you deploy must support linux/arm64 or be multi-architecture images, otherwise containers fail with exec format error.
Can I use Tailscale with Dokploy?
Yes. Tailscale can provide private access to selected websites and internal tools, such as display.example.com, by pointing their hostnames to the server's Tailscale IP. Network restrictions, such as a Traefik IP allow-list, and application authentication are still required.
Does Dokploy replace GitHub Actions?
No. Dokploy manages deployment and runtime operations, while GitHub Actions can build, test and publish container images to a registry such as GHCR before triggering a Dokploy deployment through its API.
Can Dokploy deploy applications without exposing port 3000?
Yes. Port 3000 is only needed until the dashboard has its own domain. Once the panel works over HTTPS, you can stop publishing port 3000 and close it on the cloud firewall (Step 7).
Does Dokploy support database backups?
Yes. Dokploy can back up supported databases, named volumes and its own configuration to S3-compatible storage on a schedule. Verify supported resources and encryption behaviour for your version, and always test a restore.
Is Dokploy maintenance-free?
No. Self-hosting means you own operating-system updates, Dokploy and Traefik upgrades, security reviews, monitoring and backup management.
Final thoughts
For me, the one-line installer is the least interesting part of Dokploy. What I value more is that routing, certificates, deployments, databases and backups come together as one system that I can understand, instead of a pile of scripts on different servers. If you get the basics right early (images built in CI, DNS-01 certificates, a clear line between public and private, tested backups and regular updates), a single low-cost server can handle a surprising amount of real work.
If you have any doubts or get stuck at any step, do drop a comment below. I will try to help.
References
- Dokploy documentation: Welcome, Architecture, Features
- Setup: Installation, Manual Installation
- Services: Applications, Build Types, Going Production, Docker Compose, Databases
- Networking: Domains, Cloudflare Domains, Troubleshooting Domains and Traefik, Tailscale Guide
- Operations: Auto Deploy, Watch Paths, Backups, Volume Backups, Deployment Options
- Security and editions: Production Hardening Guide, Cloud vs Self-Hosted, Comparison with CapRover, Dokku and Coolify
- Releases: Dokploy on GitHub
- PostgreSQL 18 volume path: Dokploy issue #3017
- Related: Tailscale documentation, PostgreSQL official Docker image